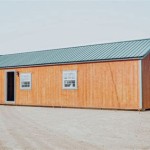
Tiny House Shed Plans are detailed instructions and blueprints that guide the construction of miniature, self-contained structures, typically used as storage, workspaces, or guest accommodations. These plans provide step-by-step guidance on materials, dimensions, and assembly techniques, enabling individuals to build compact, functional, and cost-effective spaces.
For example, a tiny house shed can be an ideal solution for storing garden tools, equipment, and outdoor supplies. Its compact size allows it to fit snugly into small yards or balconies, while its sturdy construction ensures durability against weather elements. By following a well-designed shed plan, homeowners can create a practical and organized storage solution that complements their outdoor living spaces.
In this article, we will explore the benefits and considerations of tiny house shed plans. We will provide tips on selecting the right design, materials, and construction techniques. Whether you are a seasoned builder or a novice looking to tackle your first DIY project, this guide will empower you with the knowledge and resources you need to create a functional and stylish tiny house shed.
When selecting and using Tiny House Shed Plans, there are several important points to consider:
- Clear Building Codes
- Proper Foundation
- Durable Materials
- Efficient Insulation
- Adequate Ventilation
- Functional Layout
- Roofing and Drainage
- Electrical and Lighting
- Cost-Effectiveness
- Safety Considerations
By keeping these points in mind, you can ensure that your tiny house shed is well-built, functional, and meets your specific needs and building codes.
Clear Building Codes
Before embarking on your tiny house shed project, it is crucial to familiarize yourself with the building codes and regulations in your area. These codes establish minimum standards for construction, ensuring the safety and integrity of structures. Failure to adhere to building codes can result in fines, construction delays, and even the condemnation of your shed.
To obtain the necessary building permits and ensure compliance, it is advisable to consult with your local building department. They can provide you with detailed information on the specific codes applicable to your project, including requirements for:
- Foundation and structural stability
- Electrical wiring and safety
- Plumbing and drainage
- Fire safety and egress
- Materials and construction methods
By understanding and adhering to the building codes in your area, you can ensure that your tiny house shed is not only functional and aesthetically pleasing but also safe and compliant with local regulations.
It is important to note that building codes can vary significantly from one jurisdiction to another. Therefore, it is essential to consult with your local building department to obtain the most accurate and up-to-date information. This proactive approach will help you avoid costly mistakes and ensure a smooth and successful building process.
Proper Foundation
Establishing a solid and stable foundation is paramount for the longevity and safety of your tiny house shed. The foundation provides a firm base, preventing the structure from sinking, shifting, or experiencing structural damage due to uneven ground conditions or environmental factors.
- Type of Foundation
The choice of foundation type depends on the size and weight of your shed, as well as the soil conditions at your building site. Common foundation options for tiny house sheds include concrete slabs, gravel pads, and piers.
- Soil Preparation
Before laying the foundation, the soil should be properly prepared to ensure a level and stable base. This may involve removing topsoil, compacting the soil, and adding a layer of gravel or crushed stone for drainage.
- Frost Depth
In areas with cold climates, it is crucial to consider the frost depth when designing the foundation. The foundation should be placed below the frost line to prevent heaving and potential damage caused by freezing and thawing cycles.
- Drainage
Proper drainage is essential to prevent water from accumulating around the foundation and compromising its integrity. Install drainage systems, such as French drains or weeping tiles, to divert water away from the shed and protect it from moisture damage.
By carefully considering and implementing the appropriate foundation for your tiny house shed, you can ensure a secure and durable structure that will withstand the elements and provide a solid base for years to come.
Durable Materials
Selecting durable materials for your tiny house shed is crucial to ensure its longevity, resilience, and resistance to the elements. Durable materials will protect your shed from moisture damage, pests, and extreme weather conditions, extending its lifespan and preserving its functionality.
- Pressure-Treated Lumber
Pressure-treated lumber undergoes a process where preservatives are forced into the wood under high pressure. This treatment protects the wood from rot, decay, and insect infestation, making it an ideal choice for outdoor structures like tiny house sheds.
- Galvanized Steel
Galvanized steel is coated with a layer of zinc, which prevents rust and corrosion. It is a durable and low-maintenance material that is often used for roofing, siding, and trim on tiny house sheds.
- Fiber Cement Siding
Fiber cement siding is a composite material made from cement, sand, and cellulose fibers. It is resistant to fire, moisture, and pests, and is available in a variety of textures and colors to complement any style of shed.
- Composite Decking
Composite decking is a durable alternative to traditional wood decking. It is made from a combination of wood fibers and plastic, and is resistant to moisture, fading, and splintering, making it a low-maintenance option for outdoor sheds.
By choosing durable materials for your tiny house shed, you can ensure that your structure will withstand the test of time and provide years of reliable storage or workspace.
Efficient Insulation
Insulating your tiny house shed is crucial for maintaining a comfortable and energy-efficient indoor environment, regardless of the season. Proper insulation will help regulate temperature, reduce energy costs, and prevent condensation and moisture buildup.
When choosing insulation for your shed, consider factors such as the climate in your area, the size of your shed, and the intended use of the space. Common insulation materials for tiny house sheds include:
- Fiberglass batts
Fiberglass batts are pre-cut sections of fiberglass insulation that are easy to install between the studs of your shed walls and ceiling. They are a cost-effective and widely available option.
- Spray foam insulation
Spray foam insulation is a liquid foam that is applied directly to the walls and ceiling of your shed. It expands to fill all gaps and crevices, creating a seamless and airtight seal. Spray foam insulation has a higher R-value than fiberglass batts, but it is also more expensive.
- Rigid foam insulation
Rigid foam insulation is available in sheets or panels that are attached to the walls and ceiling of your shed. It is a durable and moisture-resistant option that provides excellent insulation value.
Once you have chosen the appropriate insulation material, it is important to install it correctly to ensure maximum effectiveness. Follow the manufacturer’s instructions carefully and take the following steps:
- Use a vapor barrier
A vapor barrier is a material that prevents moisture from entering the insulation. Install a vapor barrier on the warm side of the insulation, facing the interior of the shed.
- Seal all gaps and cracks
Use caulk or expanding foam to seal any gaps or cracks around the edges of the insulation and where it meets the walls and ceiling.
- Ventilate the shed
Proper ventilation is essential to prevent moisture buildup and condensation in the shed. Install vents in the walls or roof to allow air to circulate and remove excess moisture.
By following these steps, you can ensure that your tiny house shed is well-insulated and provides a comfortable and energy-efficient indoor environment for storage, work, or recreation.
Adequate Ventilation
Proper ventilation is essential for maintaining a healthy and comfortable indoor environment in your tiny house shed. Adequate ventilation helps to prevent moisture buildup, condensation, and the accumulation of harmful pollutants. Here’s why adequate ventilation is crucial:
Moisture Control
Ventilation allows air to circulate and remove excess moisture from the shed. This is particularly important in humid climates or when the shed is used for activities that generate moisture, such as painting or storing wet items. Proper ventilation helps to prevent mold and mildew growth, which can damage the structure of the shed and pose health risks.
Condensation Prevention
Condensation occurs when warm, moist air comes into contact with a cooler surface. In a poorly ventilated shed, condensation can form on the walls, ceiling, and stored items, leading to moisture damage and mold growth. Adequate ventilation helps to reduce condensation by allowing moist air to escape and be replaced with drier air.
Pollutant Removal
Various pollutants, such as dust, fumes, and chemicals, can accumulate in a closed shed. Proper ventilation helps to remove these pollutants by bringing in fresh air from the outside. This is especially important if the shed is used for activities that generate fumes or odors, such as painting, welding, or storing chemicals.
To ensure adequate ventilation in your tiny house shed, consider the following strategies:
- Passive Ventilation
Passive ventilation relies on natural forces to circulate air. Install vents or louvers in the walls and roof of the shed to allow air to flow in and out. Position vents on opposite sides of the shed to create cross-ventilation. - Active Ventilation
Active ventilation uses fans or other mechanical devices to move air through the shed. Install an exhaust fan in the ceiling or a wall-mounted fan to draw out moist air and pollutants. A small fan can be sufficient for most sheds. - Combination Ventilation
A combination of passive and active ventilation strategies can provide the best results. Passive ventilation provides a constant flow of fresh air, while active ventilation can be used to supplement airflow when needed.
By implementing adequate ventilation in your tiny house shed, you can create a healthier and more comfortable indoor environment, protect the structure of the shed, and prevent moisture damage and mold growth.
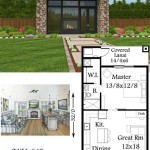
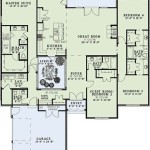
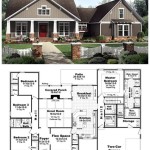
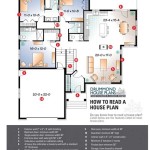
Functional Layout
A well-designed layout is crucial for maximizing the functionality and efficiency of your tiny house shed. When planning the layout, consider the intended use of the shed, the available space, and the placement of windows and doors.
- Storage Optimization
If the shed is primarily used for storage, optimize the layout to accommodate your belongings efficiently. Install shelves, drawers, and cabinets to maximize vertical space and keep items organized. Consider using stackable bins and containers to further enhance storage capacity.
- Workspace Planning
If the shed is intended as a workspace, design the layout to facilitate your activities. Ensure there is adequate space for equipment, tools, and a workbench. Consider the placement of windows and doors for natural light and ventilation.
- Multipurpose Use
For sheds that serve multiple purposes, such as storage and a workshop, create a layout that allows for both functions. Divide the space into designated areas for different activities and install flexible storage solutions that can adapt to changing needs.
- Accessibility and Safety
The layout should prioritize accessibility and safety. Ensure there is sufficient clearance for movement and that items are stored securely to prevent accidents. Consider installing ramps or stairs for easy access, and provide adequate lighting for visibility.
By carefully planning the layout of your tiny house shed, you can create a functional and efficient space that meets your specific needs and enhances the overall usability of your shed.
Roofing and Drainage
The roof and drainage system of your tiny house shed are vital components that protect the structure from the elements and ensure its longevity. Here are key considerations for roofing and drainage:
Roofing Materials
Choose durable and weather-resistant roofing materials such as asphalt shingles, metal roofing, or corrugated plastic. Consider the slope of the roof, as steeper roofs shed water more effectively. Install roofing underlayment to provide an additional layer of protection against moisture.
Roofing Ventilation
Proper ventilation is crucial to prevent moisture buildup and condensation in the attic space. Install roof vents or soffit vents to allow air to circulate and remove excess moisture. Adequate ventilation helps extend the lifespan of the roof and prevents mold growth.
Drainage System
An effective drainage system is essential to direct water away from the shed and prevent damage to the foundation and siding. Install gutters and downspouts to collect rainwater from the roof and channel it away from the structure. Consider underground drainage pipes to further improve drainage and prevent water from pooling around the shed.
Grading and Landscaping
The grading and landscaping around the shed should slope away from the structure to prevent water from accumulating near the foundation. Plant vegetation or install gravel around the shed to absorb excess moisture and improve drainage. By implementing a well-designed roofing and drainage system, you can protect your tiny house shed from water damage, extend its lifespan, and maintain a dry and healthy indoor environment.
Electrical and Lighting
Proper electrical wiring and lighting are essential for the safety and functionality of your tiny house shed. Here are key considerations for electrical and lighting systems:
- Electrical Wiring
Ensure that all electrical wiring is installed by a qualified electrician and complies with local building codes. Use appropriate wire gauges and circuit breakers to handle the electrical load of your shed. Install electrical outlets and switches in convenient locations for easy access.
- Lighting
Provide adequate lighting for your shed, both natural and artificial. Install windows to allow natural light during the day. For artificial lighting, choose energy-efficient LED bulbs and fixtures. Consider installing motion-sensor lights for added convenience and security.
- Safety Features
Incorporate safety features into your electrical system, such as ground fault circuit interrupters (GFCIs) and surge protectors. GFCIs help prevent electrical shocks, while surge protectors safeguard your electrical equipment from power surges.
- Outdoor Lighting
If your shed is located outdoors, install outdoor-rated lighting fixtures that can withstand the elements. Use path lights or floodlights to illuminate walkways and provide security around the shed.
By carefully planning and installing your electrical and lighting systems, you can ensure a safe, well-lit, and functional tiny house shed that meets your needs.
Cost-Effectiveness
Cost-effectiveness is a crucial factor to consider when building a tiny house shed. Here are key strategies to help you save money and optimize the value of your shed:
Plan and Design
Careful planning and design can significantly reduce costs. Choose a simple and efficient design that meets your essential needs. Consider using standard sizes for materials and components to take advantage of bulk discounts. By optimizing the design and minimizing waste, you can save both time and money.
Material Selection
The choice of materials can have a major impact on the overall cost of your shed. Opt for cost-effective materials such as pressure-treated lumber, corrugated metal roofing, and vinyl siding. These materials offer durability and affordability, making them ideal for budget-conscious builders.
DIY Construction
Building your shed yourself can save a considerable amount of money compared to hiring a contractor. If you have basic construction skills and tools, you can tackle the project . However, ensure you have adequate time and resources to complete the project to a satisfactory standard.
Repurposing and Salvaging
Getting creative with repurposed and salvaged materials can further enhance cost-effectiveness. Use old pallets for flooring or siding, reclaimed windows for natural light, and leftover paint or stain from other projects. By incorporating sustainable and budget-friendly materials, you can build a unique and cost-effective shed.
Long-Term Savings
While initial costs are important, consider the long-term savings that a well-built shed can provide. A durable and weather-resistant shed can protect your belongings from damage, reducing the need for costly repairs or replacements. Additionally, a well-insulated shed can help reduce energy consumption, leading to lower utility bills over time.
Safety Considerations
When constructing and using a tiny house shed, safety should be a top priority. Here are key safety considerations to keep in mind:
Structural Integrity
Ensure the structural integrity of your shed by using high-quality materials and following proper building techniques. The foundation should be sturdy and level, and the framing should be strong enough to support the weight of the structure and its contents. Proper bracing and reinforcement can prevent structural failure and ensure the longevity of your shed.
Electrical Safety
Electrical wiring and components should be installed by a qualified electrician and comply with local building codes. Use proper wire gauges and circuit breakers to handle the electrical load of your shed. Ground fault circuit interrupters (GFCIs) should be installed in areas where moisture is present to prevent electrical shocks. Ensure all electrical connections are secure and protected from the elements.
Fire Safety
Minimize fire hazards by using fire-resistant materials and keeping flammable substances away from potential ignition sources. Install smoke detectors and fire extinguishers for early detection and suppression. Clear the area around the shed of any vegetation or debris that could fuel a fire.
Access and Ergonomics
Design your shed with safe and ergonomic access in mind. Install sturdy doors and ramps or stairs for easy entry and exit. Provide adequate headroom and clear walkways to prevent accidents. Consider installing handrails or grab bars for additional support, especially if the shed is elevated.
By carefully considering and addressing these safety considerations, you can ensure that your tiny house shed is a safe and secure space for storage, work, or recreation.


Related Posts