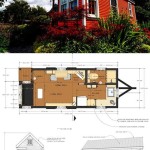
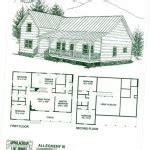
A house plan sketch is a simplified representation of the layout and design of a house. It typically includes the floor plan, which shows the arrangement of rooms and spaces on each level, as well as elevations, which show the exterior walls and rooflines. House plan sketches are often used in the early stages of the design process to help visualize the overall concept of the house and to make sure that the layout is functional and efficient.
House plan sketches can be created using a variety of methods, including hand-sketching, computer-aided design (CAD), and online software. Hand-sketching is a quick and easy way to create a rough sketch of a house plan, while CAD and online software offer more precision and flexibility. Once a house plan sketch has been created, it can be used to develop more detailed plans, such as construction drawings and specifications.
House plan sketches are an essential tool for anyone who is planning to build or remodel a house. They can help to visualize the overall concept of the house, to make sure that the layout is functional and efficient, and to communicate the design to builders and contractors.
When sketching a house plan, it is important to keep the following points in mind:
- Use a scale
- Draw walls to scale
- Indicate room dimensions
- Show doors and windows
- Label rooms
- Add furniture
- Draw exterior walls
- Indicate rooflines
- Add landscaping
By following these tips, you can create a house plan sketch that is clear, accurate, and easy to understand.
Use a scale
When sketching a house plan, it is important to use a scale. This will help to ensure that your sketch is accurate and that the dimensions of the house are correct. A scale is a ratio that compares the size of the drawing to the size of the actual object. For example, a scale of 1/4 inch = 1 foot means that 1 inch on the drawing represents 4 feet in real life.
- Choose a scale that is appropriate for the size of your house. If your house is small, you may want to use a scale of 1/4 inch = 1 foot. If your house is larger, you may want to use a scale of 1/8 inch = 1 foot or even 1/16 inch = 1 foot.
- Draw a scale bar on your sketch. A scale bar is a line that is divided into equal segments, each of which represents a specific distance. The scale bar should be placed in a conspicuous location on your sketch, such as the bottom or side margin.
- Use the scale bar to measure the dimensions of your house. To measure the length of a wall, for example, simply place the scale bar along the wall and count the number of segments that fit along the wall. Multiply the number of segments by the scale factor to get the actual length of the wall.
- Be consistent with your scale. Once you have chosen a scale, be sure to use it consistently throughout your sketch. Do not change the scale from one part of the sketch to another, as this will make it difficult to accurately measure the dimensions of your house.
Using a scale is an essential part of sketching a house plan. By following the tips above, you can ensure that your sketch is accurate and easy to understand.
Draw walls to scale
Once you have chosen a scale, you need to start drawing the walls of your house. To do this, follow these steps:
- Start by drawing the exterior walls. The exterior walls are the walls that form the perimeter of your house. When drawing the exterior walls, be sure to include all of the doors and windows.
- Next, draw the interior walls. The interior walls are the walls that divide the interior of your house into different rooms. When drawing the interior walls, be sure to include all of the doors and windows.
- Be sure to draw the walls to scale. To do this, use the scale bar that you created earlier. For example, if you are using a scale of 1/4 inch = 1 foot, then each 1/4 inch on your sketch will represent 1 foot of wall in real life.
- Once you have drawn all of the walls, check to make sure that they are all connected properly. There should be no gaps between the walls, and all of the doors and windows should be properly aligned.
Drawing walls to scale is an important part of sketching a house plan. By following the steps above, you can ensure that your sketch is accurate and easy to understand.
Here are some additional tips for drawing walls to scale:
- Use a ruler or straightedge to draw the walls. This will help to ensure that the walls are straight and accurate.
- Be sure to measure the walls carefully. Use the scale bar to measure the length of each wall, and then transfer that measurement to your sketch.
- If you are having trouble drawing the walls to scale, you can use a computer-aided design (CAD) program. CAD programs can help you to draw walls and other objects to scale quickly and easily.
Once you have finished drawing the walls, you can start to add other details to your house plan sketch, such as furniture, appliances, and landscaping.
Indicate room dimensions
Once you have drawn the walls of your house, you need to indicate the dimensions of each room. This will help to give you a better idea of the size and layout of your house. To indicate room dimensions, follow these steps:
- Measure the length and width of each room. Use a tape measure or ruler to measure the distance from one wall to the opposite wall. Be sure to measure the room in feet and inches.
- Write the dimensions of each room on the sketch. Use a pencil or pen to write the dimensions next to each room. The dimensions should be written in the following format: length x width. For example, a room that is 10 feet long and 12 feet wide would be written as “10′ x 12′.”
- Use a consistent scale. When writing the dimensions of each room, be sure to use the same scale that you used to draw the walls. This will help to ensure that the dimensions are accurate.
- Indicate the location of doors and windows. Use small symbols to indicate the location of doors and windows on your sketch. For example, you could use a small square to represent a door and a small circle to represent a window.
Indicating room dimensions is an important part of sketching a house plan. By following the steps above, you can ensure that your sketch is accurate and easy to understand. Here is an example of how to indicate room dimensions on a house plan sketch:[Image of a house plan sketch with room dimensions indicated]
Show doors and windows
Once you have drawn the walls of your house and indicated the room dimensions, you need to show the doors and windows. This will help to give you a better idea of the layout of your house and how the different rooms are connected.
To show doors and windows, follow these steps:
- Draw a small rectangle to represent each door. The rectangle should be about 1/4 inch wide and 1/2 inch tall. Be sure to draw the door in the correct location on the wall.
- Draw a small circle to represent each window. The circle should be about 1/4 inch in diameter. Be sure to draw the window in the correct location on the wall.
- Indicate the direction that the door or window opens. Use a small arrow to indicate the direction that the door or window opens. The arrow should be drawn on the side of the door or window that it opens towards.
- Label each door and window. Use a pencil or pen to write the name of each door and window on the sketch. This will help you to remember what each door and window leads to.
Here is an example of how to show doors and windows on a house plan sketch:[Image of a house plan sketch with doors and windows shown]
Showing doors and windows is an important part of sketching a house plan. By following the steps above, you can ensure that your sketch is accurate and easy to understand.
Label rooms
Once you have drawn the walls of your house, indicated the room dimensions, and shown the doors and windows, you need to label the rooms. This will help you to identify the different rooms in your house and to understand how they are connected.
To label the rooms, follow these steps:
- Write the name of each room on the sketch. Use a pencil or pen to write the name of each room inside the room. The name of the room should be written in a clear and legible font.
- Use different colors to label the different types of rooms. For example, you could use blue to label the bedrooms, green to label the bathrooms, and red to label the kitchen. Using different colors will help you to easily identify the different types of rooms on your sketch.
- Be consistent with your labeling. Once you have chosen a system for labeling the rooms, be sure to use it consistently throughout your sketch. This will help to make your sketch more organized and easy to understand.
Here is an example of how to label the rooms on a house plan sketch:[Image of a house plan sketch with rooms labeled]
Labeling the rooms is an important part of sketching a house plan. By following the steps above, you can ensure that your sketch is accurate and easy to understand.
Add furniture
Once you have labeled the rooms in your house, you can start to add furniture. This will help you to visualize how the rooms will be used and to make sure that there is enough space for everything. To add furniture, follow these steps:
- Choose the furniture that you want to add to each room. Consider the size of the room, the purpose of the room, and your personal style. You can find furniture ideas in magazines, online, or by visiting furniture stores.
- Draw the furniture to scale. To do this, use the same scale that you used to draw the walls and other features of your house. For example, if you are using a scale of 1/4 inch = 1 foot, then each 1/4 inch on your sketch will represent 1 foot of furniture in real life.
- Place the furniture in the room. When placing the furniture, consider the flow of traffic and the amount of space that you need to move around. You should also make sure that the furniture is arranged in a way that is both functional and aesthetically pleasing.
- Label the furniture. Once you have placed the furniture in the room, label each piece of furniture. This will help you to identify the different pieces of furniture on your sketch and to understand how they are used.
Adding furniture is an important part of sketching a house plan. By following the steps above, you can ensure that your sketch is accurate and easy to understand. Here is an example of how to add furniture to a house plan sketch:[Image of a house plan sketch with furniture added]
Adding furniture to your house plan sketch can help you to visualize how the rooms will be used and to make sure that there is enough space for everything. It can also help you to identify any potential problems with the layout of your house, such as traffic flow issues or lack of storage space.
Draw exterior walls
The exterior walls of your house are the walls that form the perimeter of the house. They protect the interior of the house from the elements and provide support for the roof. When drawing the exterior walls, be sure to include all of the doors and windows.
- Start by drawing the foundation. The foundation is the base of the house and it supports the exterior walls. The foundation should be drawn as a thick line around the perimeter of the house.
- Next, draw the exterior walls. The exterior walls should be drawn on top of the foundation. The walls should be drawn as lines that are perpendicular to the foundation. Be sure to draw the walls to scale.
- Add doors and windows. Once you have drawn the exterior walls, you need to add the doors and windows. Doors and windows should be drawn as small rectangles or circles. Be sure to draw the doors and windows to scale.
- Check your work. Once you have drawn all of the exterior walls, doors, and windows, check your work to make sure that everything is accurate. Be sure to check the following:
When drawing the exterior walls of your house, it is important to be accurate and to follow the steps above. By following these steps, you can ensure that your sketch is accurate and easy to understand.
Indicate rooflines
The rooflines of your house are the lines that define the shape of the roof. They are an important part of the overall design of the house and they can affect the look and feel of the interior spaces. When indicating rooflines on your sketch, be sure to include the following:
- The pitch of the roof. The pitch of the roof is the angle of the roofline. A steeper pitch will result in a taller roof, while a shallower pitch will result in a flatter roof. The pitch of the roof is typically determined by the climate and the style of the house.
- The type of roof. There are many different types of roofs, including gable roofs, hip roofs, and flat roofs. The type of roof that you choose will depend on the style of the house and the climate. Gable roofs are the most common type of roof, but they are not as well-suited for areas with high winds. Hip roofs are more expensive to build than gable roofs, but they provide better protection from the elements. Flat roofs are the least expensive to build, but they are not as durable as gable roofs or hip roofs.
- The location of any dormers or skylights. Dormers are small windows that are installed in the roof of a house. They provide additional light and ventilation to the interior spaces. Skylights are larger than dormers and they provide a view of the sky from the interior spaces. Dormers and skylights can be added to any type of roof, but they are most commonly found on gable roofs.
- The location of any chimneys or vents. Chimneys are used to vent smoke and fumes from fireplaces and stoves. Vents are used to ventilate the attic and other enclosed spaces. Chimneys and vents should be located on the roofline in a way that they do not interfere with the pitch of the roof.
Indicating rooflines on your house plan sketch is an important part of the design process. By following the tips above, you can ensure that your sketch is accurate and easy to understand.
Add landscaping
Landscaping is an important part of any home, and it can add value to your property and improve your quality of life. When adding landscaping to your house plan sketch, be sure to consider the following:
- The type of plants you want to grow. Some plants are better suited for certain climates than others. You should also consider the amount of sunlight and water that your plants will need.
- The size and shape of your yard. You need to make sure that you have enough space for the plants that you want to grow. You should also consider the shape of your yard and how you want to use it.
- The style of your home. The landscaping should complement the style of your home. For example, a traditional home might have a more formal landscape design, while a modern home might have a more contemporary landscape design.
- Your budget. Landscaping can be expensive, so you need to set a budget before you start planning. You should also consider the ongoing costs of maintaining your landscape.
Adding landscaping to your house plan sketch is a great way to visualize how your home will look in its finished state. By following the tips above, you can ensure that your landscaping is both beautiful and functional.


Related Posts